本帖最后由 TwilightZ 于 2024-01-15 22:04 编辑
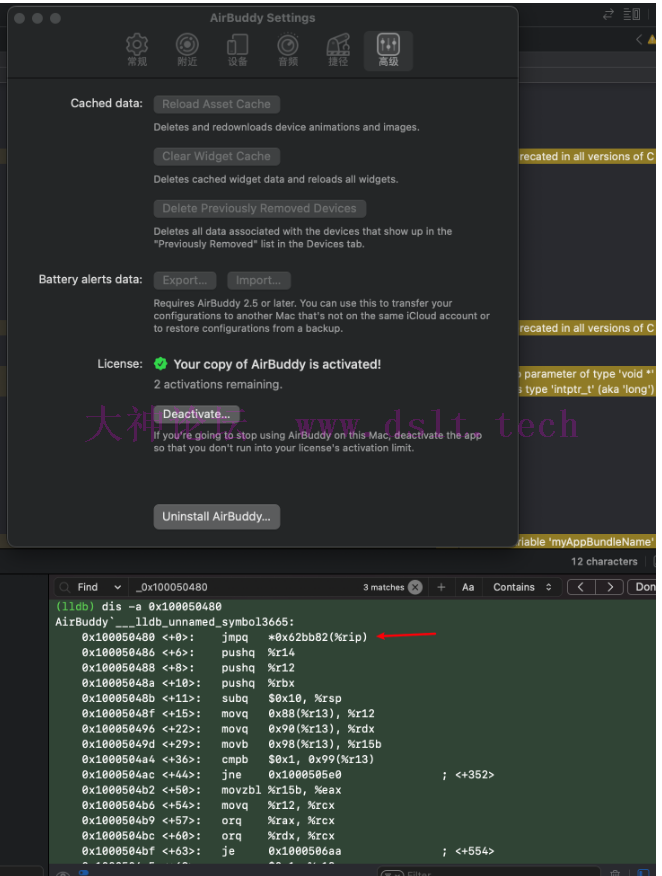
前记xcode 开发 dylib , 基于跨平台的 dobby HOOK 框架来构建跨平台的通杀补丁.
你妈再也不用担心你只能跑 Rosetta 了.. 开发环境: - xcode
- dobby
- insert_dylib
- hopper | ida
项目搭建- xcode 新建一个 MacOS > Library 项目
稍微做一些配置:
-- 关掉代码优化: Optimization Level -> None
这个东西开了的话 hook 或者 写内联汇编会出问题 -- 跨平台构建打开: Build Active Architecture Only > No
这个东西开了的话, m系列代码 编译出来的 x86/arm 都可以用,跨平台必备 项目中引入 dobby 动态库 < libdobby.dylib >, 并且 引入 dobby.h 头文件 编写 hook 代码
hook 代码先根据 系统架构宏 写个判断 #if defined(__arm64__) || defined(__aarch64__)
// 此处写 arm hook 代码
#elif defined(__x86_64__)
// 此处写 x86_64 hook 代码
#endif
+ (void) load {
NSString *appName = [[NSBundle mainBundle] bundleIdentifier];
const char *myAppBundleName = [appName UTF8String];
NSAlert *alert = [[NSAlert alloc] init];
[alert setMessageText:@"确认执行破解操作吗?"];
[alert addButtonWithTitle:@"确认"];
[alert addButtonWithTitle:@"取消"];
NSInteger response = [alert runModal];
if (response == NSAlertFirstButtonReturn) {
// 用户选择了确认按钮
// AirBuddy();
} else {
// 用户选择了取消按钮
return;
}
}
#elif defined(__x86_64__)

int _0x100050480New() {
    NSLog(@"==== _0x100050480New called");
    __asm
    {
        mov byte ptr[r13+99h], 0
    }
    NSLog(@"==== _0x100050480New call end");
    return _0x100050480Ori();
}

void AirBuddy() {
    NSLog(@"The current app running environment is __x86_64__");
    intptr_t _0x100050480 =  _dyld_get_image_vmaddr_slide() + 0x100050480;
    DobbyHook(_0x100050480, _0x100050480New, (void *)&_0x100050480Ori);
    NSLog(@"_0x100050480 >> %p",_0x100050480);
}
#endif
用同样的方法, 我们用 hopper 或者 ida 找到 arm 下的目标函数。 
可以看到 , 函数地址为: 0x1000553b8
并且由 x20+99h 来判断是否已注册, hook 代码如下:
wzr 是一个特殊的寄存器,表示零寄存器,它的值始终为0。
通过将 wzr 寄存器的值存储到[x20, #0x99]内存地址处 #if defined(__arm64__) || defined(__aarch64__)
int _0x1000553b8New() {
// r20 + 0x99 != 0x1
NSLog(@"==== _0x1000553b8New called");
__asm__ __volatile__(
"strb wzr, [x20, #0x99]"
);
NSLog(@"==== _0x1000553b8New call end");
return _0x1000553b8Ori();
}
void AirBuddy() {
NSLog(@"The current app running environment is __arm64__");
intptr_t _0x1000553b8 = _dyld_get_image_vmaddr_slide() + 0x1000553b8;
DobbyHook(_0x1000553b8, _0x1000553b8New, (void *)&_0x1000553b8Ori);
NSLog(@"_0x1000553b8 >> %p",_0x1000553b8);
}
#elif defined(__x86_64__)
build 注入编译后, 会得到一个我们的 dylib 补丁
然后编写 shell 脚本,来注入 current_path=$PWD
echo "当前路径:$current_path"
app_name="AirBuddy"
dylib_name="dylib_dobby_hook"
prefix="lib"
insert_dylib="${current_path}/../tools/insert_dylib"
# 我们的 release 补丁路径
BUILT_PRODUCTS_DIR="${current_path}/../Release"
app_bundle_path="/Applications/${app_name}.app/Contents/MacOS/"
cp -f "${insert_dylib}" "${app_bundle_path}/"
app_bundle_framework="/Applications/${app_name}.app/Contents/Frameworks"
app_executable_path="${app_bundle_path}/${app_name}"
app_executable_backup_path="${app_executable_path}_Backup"
# 第一次注入的之后备份源文件
if [ ! -f "$app_executable_backup_path" ];
then
cp "$app_executable_path" "$app_executable_backup_path"
fi
# 把补丁 与 补丁依赖的 dobby hook 框架都复制到目标程序下
cp -R "${BUILT_PRODUCTS_DIR}/${prefix}${dylib_name}.dylib" ${app_bundle_framework}
cp -R "${BUILT_PRODUCTS_DIR}/libdobby.dylib" ${app_bundle_framework}
# 用 insert_dylib 来向目标程序注入
"${app_bundle_path}/insert_dylib" --weak --all-yes "@rpath/${prefix}${dylib_name}.dylib" "$app_executable_backup_path" "$app_executable_path"
效果如下: x86_64
armarm hook 的汇编代码怎么感觉看着有点奇怪 ?? 
代码优化基础代码已经完成, 为了兼容更多的 app 补丁, 我们对代码做一些重构优化。
使用适配器模式来扩展 定义 Hack 接口接口定义几个方法, 比如教研app名称/版本号,以及执行 hack @protocol HackProtocol
- (NSString *)getAppName;
- (BOOL)checkVersion;
- (BOOL)hack;
@end
定义实现类(已当前 Airbuddy 为例)#import "HackProtocol.h"
@interface AirBuddyHack : NSObject <HackProtocol>
@end
@implementation AirBuddyHack
- (NSString *)getAppName {
return @"codes.rambo.AirBuddy";
}
- (BOOL)checkVersion {
return YES;
}
- (BOOL)hack {
[self hook];
return YES;
}
#if defined(__arm64__) || defined(__aarch64__)
- (void)hook {
...doSomething
}
#elif defined(__x86_64__)
- (void)hook {
...doSomething
}
#endif
@end
定义一个全局的适配器工具类, 根据 appName 来获取对应的实现类,来执行 hack 操作@implementation Constant
static void __attribute__ ((constructor)) initialize(void){
NSLog(@"constant init");
}
+ (BOOL)isDebuggerAttached {
BOOL isDebugging = NO;
// 获取当前进程的信息
NSProcessInfo *processInfo = [NSProcessInfo processInfo];
// 获取进程的环境变量
NSDictionary *environment = [processInfo environment];
// 检查环境变量中是否有调试器相关的标志
if (environment != nil) {
// 根据环境变量中是否包含特定的调试器标志来判断是否处于调试模式
if (environment[@"DYLD_INSERT_LIBRARIES"] ||
environment[@"MallocStackLogging"] ||
environment[@"NSZombieEnabled"] ||
environment[@"__XDEBUGGER_PRESENT"] != nil) {
isDebugging = YES;
}
}
return isDebugging;
}
+ (intptr_t)getBaseAddr:(uint32_t)index{
BOOL isDebugging = [Constant isDebuggerAttached];
if(isDebugging){
NSLog(@"The current app running with debugging");
#if defined(__arm64__) || defined(__aarch64__)
// 不知道为什么
// arm 环境下,如果是调试模式, 计算地址不需要 + _dyld_get_image_vmaddr_slide,否则会出错
return 0;
#endif
}
return _dyld_get_image_vmaddr_slide(index);
}
+ (NSArray<Class> *)getAllHackClasses {
NSMutableArray<Class> *hackClasses = [NSMutableArray array];
int numClasses;
Class *classes = NULL;
numClasses = objc_getClassList(NULL, 0);
if (numClasses > 0) {
classes = (__unsafe_unretained Class *)malloc(sizeof(Class) * numClasses);
numClasses = objc_getClassList(classes, numClasses);
for (int i = 0; i < numClasses; i++) {
Class class = classes[i];
if (class_conformsToProtocol(class, @protocol(HackProtocol))) {
[hackClasses addObject:class];
}
}
free(classes);
}
return hackClasses;
}
+ (void)doHack:(NSString *)currentAppName {
NSArray<Class> *personClasses = [Constant getAllHackClasses];
for (Class class in personClasses) {
id<HackProtocol> it = [[class alloc] init];
NSString *appName = [it getAppName];
if ([appName isEqualToString:currentAppName]) {
// TODO 执行其他操作 ,比如 checkVersion
[it hack];
break;
}
}
}
@end
最后在 dylib 入口处传入 appName+ (void) load {
NSString *appName = [[NSBundle mainBundle] bundleIdentifier];
NSAlert *alert = [[NSAlert alloc] init];
[alert setMessageText:@"确认执行破解操作吗?"];
[alert addButtonWithTitle:@"确认"];
[alert addButtonWithTitle:@"取消"];
NSInteger response = [alert runModal];
if (response == NSAlertFirstButtonReturn) {
[Constant doHack:appName];
} else {
return;
}
}
@end
至此,代码重构优化结束,如果补丁要支持新的 app ,只需要添加一个 HackProtocol 实现类即可,
对别的地方的代码, 零入侵.
下方隐藏内容为本帖所有文件或源码下载链接:
游客你好,如果您要查看本帖隐藏链接需要登录才能查看,
请先登录
|
 发表于 2024-01-15 22:04